HARDNESS
The hardness of a material means the resistance of a surface of the sample to the penetration of a harder body, for example the ball or the tip (or indenter) of a Hardness Tester. If it withstands it well, it is said to be hard; otherwise, it is said to be soft.
Specifically, hardness is measured by correlating the size of the indentation (Vickers, Knoop and Brinell hardness) or its depth (Rockwell hardness).
This indentation is created using a Hardness Tester that applies the load via the indenter onto the sample to be tested.
Hardness measurements are standardised. Regarding hardness tests and their reference standards::
- Vickers: ISO 6507 and/or ASTM E384
- Knoop: ISO 4545 and/or ASTM E384
- Rockwell: ISO 6508 and/or ASTM E18
- Brinell: ISO 6506 and/or ASTM E10
A distinction is generally made between micro-hardness (tests with loads < in kgF) and hardness or macro-hardness for higher loads. Below, we will specifically discuss the different hardness tests and the equipment for conducting them.

The Vickers hardness
Compared to the Brinell hardness, the Vickers hardness has the advantage that, regardless of the material tested and the load used, the indenter remains the same, regardless of the hardness of the material.
The Vickers hardness uses a square-based diamond pyramid as an indenter.

The Knoop hardness
The Knoop hardness uses a diamond indenter leaving an indentation in the shape of a stretched rhombus.
Thanks to the shape of its indenter, the Knoop test method is particularly suitable for:
- Thin layer hardness measurements,
- Fragile materials (such as glass/ceramics) – the only method suitable for this type of material.
Like the Vickers hardness, the Knoop hardness uses a single indenter for all measurements.
The Knoop hardness is not widespread in Europe.

The Rockwell hardness
The Rockwell hardness measures the residual deformation from a force applied via a spherical or conical indenter.
Unlike all other types of hardness, the Rockwell hardness does not employ the principle of optical reading of the indent; therefore, this method escapes surface conditions.
These are simple tests, requiring little preparation of the sample surface. Rockwell tests are therefore fast. That is why the Rockwell hardness is now widely used in industry.
However, Rockwell tests suffer from a lower accuracy than the previously listed tests and from the fact that many factors can distort the measurement; the regular use of a test block is strongly recommended.

The Brinell hardness
This method largely inspired first of all the Vickers method and then the Knoop method because all three are based on the same principle: the observation of the deformation of materials when facing a force applied by means of a standardised indenter.
Brinell tests strongly mark the materials and require several spherical indenters, depending on the loads used. These last two characteristics make Brinell tests rather inconvenient to use in an industrial environment.

Hardness at PRESI
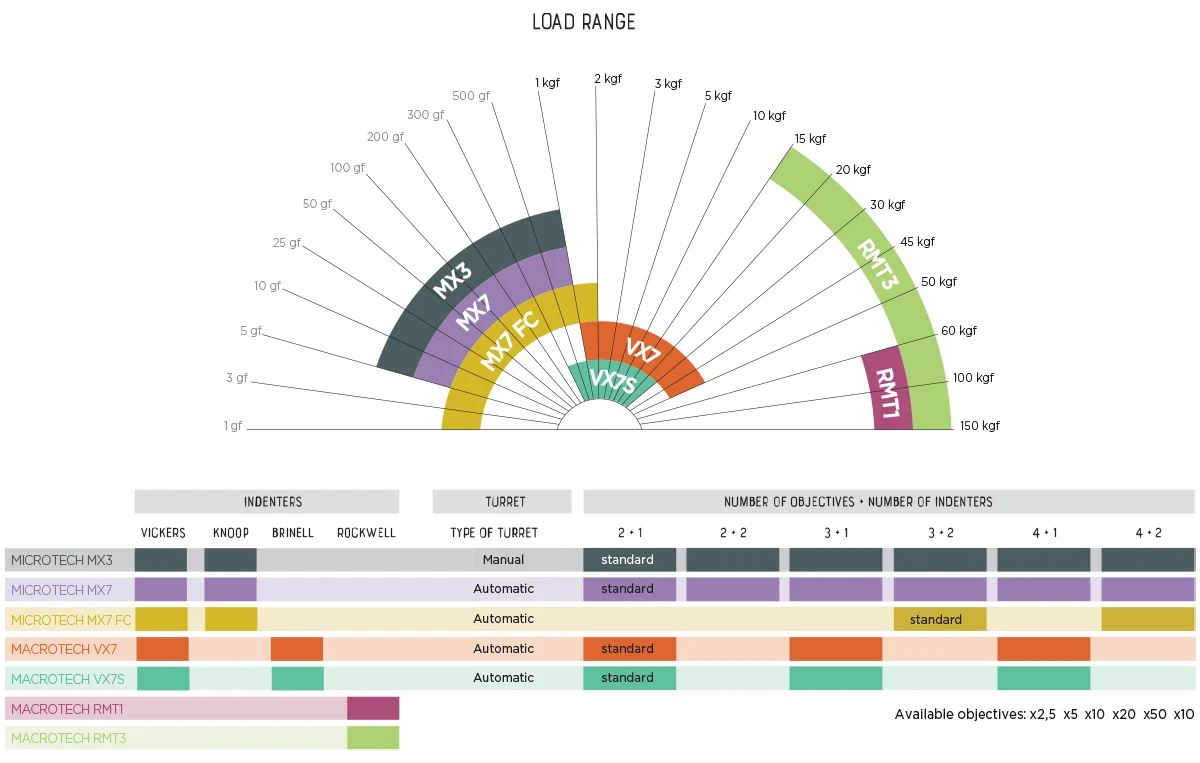
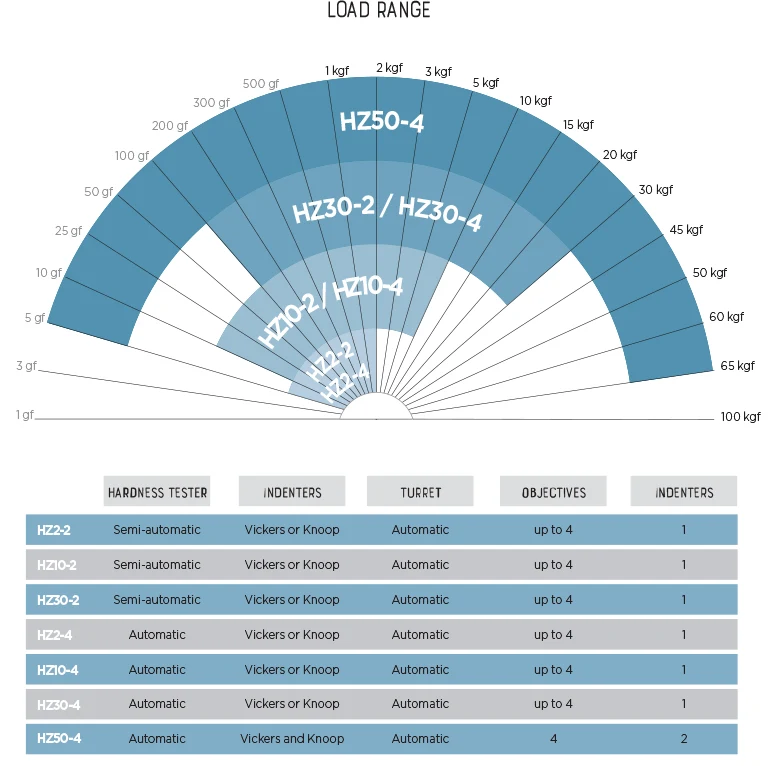
Regarding the machines themselves, we use several types of technology:
- Load cell: the force is applied by an electric motor and is controlled via a load cell: the HZ Hardness Tester range and the Matsuzawa Rockwell Hardness Tester range.
- Mechanical weight: the force is applied by physical masses: the Vickers Hardness Tester range and Knoop Matsuzawa Hardness Tester range.
Depending on the set-up, the Hardness Tester can be used autonomously (without a computer) or automatically.
Automation means the use of an image processing software and the motorisation of the axes (the XY table, the vertical Z axis and turret).


